Posts

Showing posts from 2017

Inside Turnigy AE-65A

Image
If you are trying to flash your Turnigy AE-65A ESC but you are not sure what MCU is inside, here is the answer. Inside is Silicon Labs C8051F310 MCU, the same one as inside Turnigy AE-45A. So that means you can flash it with BLHeli firmware for 45A version? I'm pretty sure the answer is yes but I didn't test it yet. If I do that I will post it here. Here are some pictures from inside. I have checked pinouts and they are same as those on AE-45A. Image 1 - C8051F310 with pinouts for C2 interface Link to datasheet: https://www.silabs.com/documents/public/data-sheets/C8051F31x.pdf   Image 2 - C8051F310 Pinout Diagram Image 3 - before disassembling Image 4 - the bottom side of the upper part after disassembling 
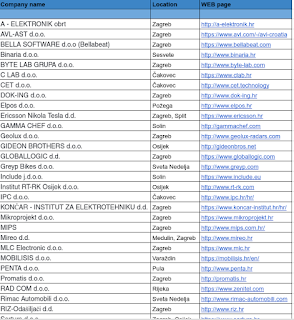
List of all embedded systems companies in Croatia (2017)

Image
If you are an Embedded system developer and you are looking for a job in Croatia. Here is the list of all companies which works with Embedded systems.  I hope this will help you to make your decision.

AUTOSAR and CRC calculation

Image
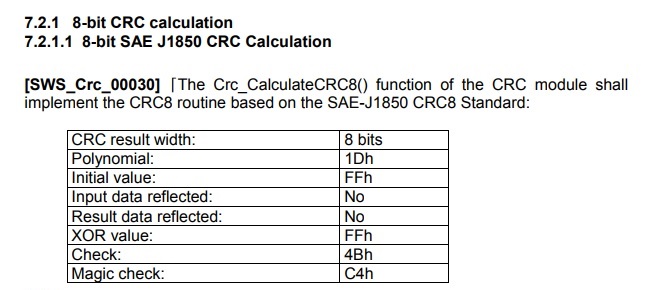
If you find yourself reading AUTOSAR document Specification of CRC Routines you are probably looking for a solution on how to implement it in your code. This is short instruction without explaining how CRC works. It includes working CRC code with examples from the mentioned documentation. Explanation of CRC8 CRC 8 it means, the polynomial of CRC is 8 bit long.  Explaining chapter 7.2.1: CRC result width - it is the return value, it says it is 8 bits long Polynomial - this value is used to calculate CRC. In this case, it is 0x1D Initial value - CRC calculation start with this value. It is usually all F's or zeros.  Input data reflection - it says if the data which you want to do CRC need to be reflected or not. Example of data reflection: hex: 0x73 or binary: 1110011, reflected value is: 1100111 or hex 0x67 Result data reflected - same as input data, but the only result is reflected XOR value - result value need to be XOR-ed with this value before is r

Running Nuttx RTOS on EK-TM4C123GXL

Image
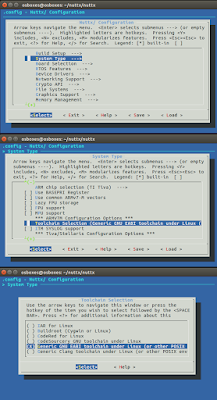
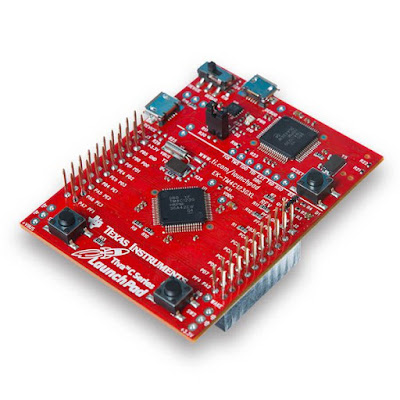
This is the short tutorial on how to build and flash Nuttx, the real-time operating system on TM4C123G LaunchPad on fresh installed Ubuntu 16.04 LTS. More about Nuttx for TM4C123G LaunchPad: https://bitbucket.org/nuttx/nuttx/src/42a0796615909b301273ee30fd5af907f4253347/configs/tm4c123g-launchpad/?at=master Building Nuttx In terminal run this commands: mkdir nuttxdir cd nuttxdir git clone https://bitbucket.org/nuttx/nuttx git clone https://bitbucket.org/nuttx/apps git clone https://bitbucket.org/nuttx/tools sudo apt-get install gperf flex bison libncurses5-dev cd tools/kconfig-frontends/ ./configure --enable-mconf make sudo make install sudo ldconfig cd ../.. Without libncurses5-dev you will have the problem with kconfig-mconf, so don't miss to install it.  cd nuttx/tools ./configure.sh tm4c123g-launchpad/nsh cd .. make menuconfig Inside menu config, you need select System Type -> Toolchain Selection -> Generic GNU EABI toolchai

Debugging EK-TM4C123GXL with Visual Studio Code on Linux

Image
If you have TM4C123G LaunchPad Evaluation Kit and you like Visual Studio Code here is how to setup debugging on this board. This is the tutorial how to do that on clean Ubuntu 16.04 LTS. ARM GCC Compiler Setup Download the latest GCC cross compiler for the ARM from here:  https://launchpad.net/gcc-arm-embedded/+download In the time of writing this text, the last one is    gcc-arm-none-eabi-5_4-2016q3-20160926-linux.tar.bz2 Run this commands in Linux console. wget https://launchpad.net/gcc-arm-embedded/5.0/5-2016-q3-update/+download/gcc-arm-none-eabi-5_4-2016q3-20160926-linux.tar.bz2 tar -jxf gcc-arm-none-eabi-5_4-2016q3-20160926-linux.tar.bz2 rm gcc-arm-none-eabi-5_4-2016q3-20160926-linux.tar.bz2 exportline="export PATH=$HOME/gcc-arm-none-eabi-5_4-2016q3/bin:\$PATH" echo $exportline >> ~/.profile source ~/.profile sudo dpkg --add-architecture i386 sudo apt-get update sudo apt-get install libc6:i386 lib32ncurses5 Without i386 architecture you will

APM2 power supply and burned Pixracer

Image
This took me some time to fix it so I decided to write a short blog post about it. The story goes in this way. Because I found out it could also work for Pixracer I bought the power supply for APM2 on eBay.  After I received it, I connected it to the battery and after to Pixracer. At first, everything seemed fine for the first 3 sec. Soon, I start smelling smoke. I unplugged the battery and find out that one small piece is burned out. You can see this part in the image below. I had trouble to find out what is the name of the part because it was burned out. Then I opened the schema and used some debugging technics on board and I found out it is the AP7365-33WG-7 linear regulator. From schema, I realized it supply power for ESP. Even with a burned regulator,  the Pixracer was still working but without ESP. The easiest way to figure out if this regulator is not working is to check ESP power led. If it is not turned on it means that the regulator is dead. With some hot air sold